Posts

Elektrosluch!

Image
Hey everyone! With the release of my electromagnetic sound library on the horizon, I wanted to share some of the process of building an Elektrosluch and recording the sounds. For those of you who don't know, an Elektrosluch is a type of induction coil pickup. These devices pick up electromagnetic fields emitted by electronic devices, if it's got power it probably sounds cool. The most common version of this device that I've seen is produced by LOM . They have various versions and a DIY kit. I'm not sure about you, but I have never been lucky enough to see the store page with an 'in stock' label on it. Some lucky colleagues have snagged one or two in passing but I could never seem to find the window. Fed up with waiting I discovered that the schematic is open source! LOM even links Makezine.com  in their FAQ, parts list and instructions included. I have decided to draw my own diagram that labels each part so you don't get lost referencing back and forth of

GDC field recordings

Hey all! A quick post today, just finished going through my recordings from San Fran. I had a chance to record some city ambiances, sea lions and even a janky escalator. I've uploaded them to dropbox to share with everyone! I've left them as the raw wavs so you can do what you please with them. Recorded at 96kHz 24 Bit on a Zoom H4N Remember to always be recording! https://www.dropbox.com/sh/pv63qr1jev1vqg0/AABEt8pZbwBAOhFtH_baIp9Ia?dl=0

"I Enjoy You" - A GDC Reflection

As another GDC passes by I sit on the first plane home, reflecting on the week. My second conference was jam packed with eye opening talks and beautiful people. Friends new and old gathered with me to share our love for the industry in an educational and celebratory event. Flashback to last year: Alone, first time traveling to the west coast and my first ever exposure to GDC and the gaming industry at large. As a Sound Designer I was lost within my craft, lacking mentors and constructive peers. I arrived there with only one goal; to learn. Over the course of the week I discovered the incredible entity that is the Game Audio Community. Suddenly I was absorbed by this creative force of talent and beautiful individuals. I wasn't alone anymore. As the week progressed I was exposed to brilliant talks and flooded with information. I started mingling with people whose work I had been exposed to and feeling like a small speck of dust in this giant world. By the end of the week, I felt

Skelemen: "Damn it, Jim, I'm a Sound Designer not a Programmer!"

Image
"Damn it, Jim, I'm a Sound Designer not a Programmer!" Hey everyone! Recently, I have taken on the challenge of building a Unreal Engine 4 level from scratch, with the soul purpose of being a showcase for my audio implementation and sound design. It has since evolved beyond that (although that is still the end goal/result) and I wanted to log my adventure through blueprints, crashes, successes and failures. I bequeath you, Skelemen. I started my journey into building a level with no assets, very little experience in level design and implementation using UE4. (See my previous implementation demo on my site) With this one I wanted to take another approach and try something different. In the other demo I had created a  more realistic world for the player character to explore. A.K.A. Human pawn, third person, roaming around a warehouse. Inspiring, right? This time I was looking for a more Indie and cartoony look. I scoured the Epic Games Market place looking for

DIY Patch panel!

Image
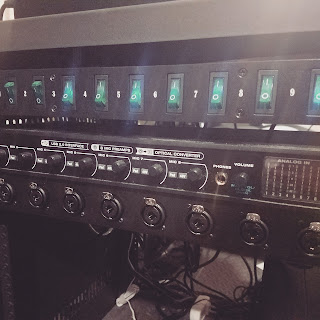
Hey all, after a couple comments and messages on the photos I've been posting I decided to do a quick write-up on my patch bay project. To give you more context; I have a rack bay where I store my MOTU 8pre interface. The 8 mic/line ins are on the back of the unit, which is perfectly fine, unless your rack unit is twice the depth of the interface. Reaching in to change mic cables was cumbersome and annoying. I decided to look for a snake to move around the front for easy access. After a deal of research I only found bricks for stage use and patch bays that are much too large for my application (16+ mic only lines) so,  I decided to go the DIY route. Here I'll give you a break down of the materials I used. some resources I found and how I went about assembling it.  DISCLAIMER: I am no means a professional electrician. I assume you have the basics down of using a soldering iron and a wire stripper. First off, a list of parts: 1. The rack plate and Neutrik Mic/line in inputs